• Skip to main content
  • Skip to footer

Current Marketing Services

Websites & WordPress Monthly Maintenance Plans

  • About
    • Testimonials
    • Work Portfolio
  • Website Services
    • Website Design
      • New Website Pricing
    • Maintenance Services
    • Our Marketing Services
    • WordPress Training
  • SEO Services
  • Resources
    • Blog
  • Contact
You are here: Home / Archives for WordPress Help

WordPress Help

WordPress Tips for Newbies

July 14, 2022 By Webmaster

As a small business owner, you’re always looking for ways to save time and money. WordPress is a great platform for building websites, but it’s important to learn some key tips before getting started.

Here is a summary of some of the more important guidelines:

1. Know the difference between a Page or Post:

  • A page is where your main content is created, such as Home, About, Contact, and Blog Page. A post is a BLOG page and when published will show up in your blog feed. Some websites present their blog as their home page and others create a separate page for their blogs. In the setup process, go to your DASHBOARD, look on the left panel for APPEARANCE then CUSTOMIZE, then HOMEPAGE SETTINGS.
  • When creating a new post, be sure to assign it to one broad category and use descriptive titles and tags so that people can easily find your content.
  • When copying text from a word-processing program or another website, remove the formatting first.  The best way to do this is to post into Notepad first to remove any formatting.
  • Use Chrome or Firefox browsers to take advantage of their spellcheck features; otherwise, be certain to use spellchecker before publishing your page.
  • Don’t use the default permalink created for your page or post if your title is long. You have one chance to change your permalink (URL), before you publish your page or post. Check your permalink (URL or internet address) before initially publishing your page to make sure it is “pretty” and useful.  You don’t want it to be too long and it should contain a keyword. Sometimes WordPress assigns numbers to pages and posts – use the “edit” button to make this permanent pretty permalink change.

2. Maintain your site to keep it safe from hackers & malware:

  • BACKUP often and ALWAYS before any updates.  Make sure to always back up your site before updating to avoid losing any data. Take at least one backup a month and after you make changes.  Use a plugin or the tools on your hosting server to take backups of your files and database.
  • Delete spam comments
  • Keep your password secure and difficult, and choose usernames that are not obvious (Please do not use ADMIN or 1234567!)
  • Don’t share your password with other users.  Create a new USER account for each person on your WordPress website. You should consider creating a new user account for yourself that is strictly for adding posts (EDITOR).
  • Keeping your WordPress site up-to-date is important for security and stability – Update WordPress core, themes, and plugins as needed
  • If multiple updates are needed, update plugins first, then themes then your WordPress core files.
  • If you have plugins or themes that are not being used, remove them from your site.
  • Keep your own desktop/laptop computer up-to-date and free of malware.
  • Minimize the load on your website by not adding too many plugins.
  • Only add plugins from reputable developers: read reviews and support logs before uploading a new plugin to your website.
  • Use an anti-spam plugin – some of the newer security plugins include anti-spam protection or install a stand-alone plugin such as AntiSpam Bee.
  • Worried that you have malware on your site? Scan it for free at https://sitecheck.sucuri.net/. While this tool may not detect all malware, it may give you an idea if your site was hacked.
  • If you don’t have time to manage your site, hire someone to do it for you!

3. Optimize your Images:

  • Resize images BEFORE uploading them. Large images can slow down your website, so it’s important to optimize them for faster loading times. You can do this by reducing the file size or using a content delivery network (CDN). You can use Canva, BeFunky, PicMonkey, TinyPng, or ImageOptimizer to change your photo size and save it to a web-safe size.
  • Take time to fill in descriptions and alternative text (ALT Text) – the ALT text is used by search engines and those that use assistive devices so make sure to describe the image in detail.
  • You can add a hyperlink to your image and link to a page on your website rather than back to the original image. Keep in mind though that mobile phone users scrolling down a page may inadvertently click on a photo link which will take them away from the page they are viewing.
  • 800 to 1200 pixels wide are common widths for a post image.
  • 1600 pixels is a common width for a front page hero image.
  • 200kb is the recommended maximum file size of any image. Oversized images cause slower load times. Under 100kb is ideal.

4. Find WordPress Help

WordPress is the world’s most popular and widely used content management system powering more than a third of all websites on the internet. Popularity means there are many user groups and forums that share knowledge on how to get started. Also, when working within your WordPress dashboard, help is just a click away. Look in the upper right-hand corner and click the down arrow where it says HELP.

Of course, if you need personal one-on-one assistance, contact Current Marketing for the WordPress help you need.

As a small business owner, you’re always looking for ways to save time and money. WordPress is a great platform for building websites, but as a WordPress newbie, it’s important to learn some key tips before getting started. Proper maintenance of your website can save you time and money in the long run. Optimizing your images can also help your website load faster, which is important for keeping visitors on your site. Finally, knowing where to find help when you need it can save you a lot of frustration down the road.

We hope you found the WordPress help you were looking for. If you have any questions, please feel free to send us a message via our Contact Form.  

This article was originally posted on May 19, 2013, and has been updated.

Filed Under: WordPress, WordPress Help Tagged With: website help, wordpress, wordpress help, wordpress maintenance

No More Mistakes – How To Make Your Images Website Friendly

July 7, 2018 By Webmaster

Images are an important part of blog posts and pages on your website.

Website friendly image of a camera taking photo of a butterfly
Photo by Jamie Street, Unsplash

Adding a photo or image to your blog page or website can help add interest to the page, help the reader better understand the content on the page, and help to improve the SEO ranking of a page.  A good rule of thumb is to have at least one image per page view as you scroll down a page. Adding too many images may be distracting to the important content on the page, and too many images may slow web page load time. You can check the load time of your website pages at Pingdom Website Speed Test or at GTMetrix.com

Don’t make this mistake – A commonly overlooked aspect of using images on a website is making sure they are website and mobile-friendly.  A print-friendly image should not be used in website development.

Here are 4 steps you can take to make sure your images are website-friendly:

1. Resize images BEFORE uploading them:

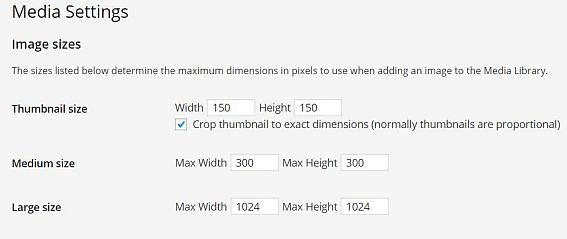
Photos and images on a web page should be sized according to their use.  Consider where the image will be used and what size the image needs to be.  While in your WordPress dashboard, click on settings, then on Media.  You can see the default options for your image dimension sizes.  In the example below, you can see that the largest image defaults to 1024 pixels wide.  So it makes no sense to upload an image that is wider than 1024 pixels wide.  If you are placing an image on your sidebar, the 1024 pixel wide image will be too large.  The sidebar is generally about 1/3 of the page width (1024px/3 =341 px,). So a more appropriate size for the sidebar image is 341 pixels wide.  The goal is to use the smallest and fastest loading image as possible without affecting quality.  The larger the image, the longer it will take to load. The load time of a page is an important consideration for a better user experience. A good user experience directly correlates to improved search engine rankings!


WordPress image size setting in dashboard
WordPress Media Settings

Visit our resource page  for links to a few free image editors that can help with image resizing and optimization.

2.  Choose the best resolutions – Image Compression:

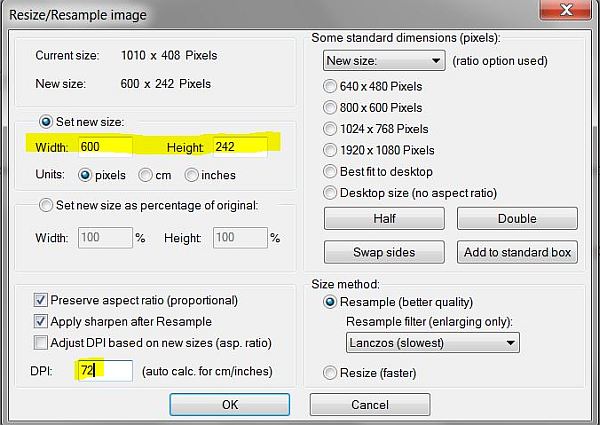
Image resolution is the number of pixels that can fit into an area. A web-friendly image is commonly set to 72 dpi (dots per inch) or more properly ppi (pixels per inch)

Text based png images often are better compressed to 96 dpi. Most importantly is the ending file size.  Ideally, a WordPress website image should have a file size smaller than 100KB – larger hero images may need to be sized larger, but we recommend no larger than 250kb.

Resizing Image Using Irfanview

There are plugins that can be used to optimize images, but it is always better to resize images BEFORE they are uploaded.

3. Choose the best file type for the application:

It’s important to use the correct image format (extensions) for your website.

  • .jpg – This file format is ideal for most website image applications.  It offers the best file size and image quality, therefore, all website images should be saved as jpgs unless they have a transparent background.
  • .png – This file format is necessary for images with a transparent background.  Png formatted images are also used when the quality needs to remain high, such as the website ad banner. The trade off is a larger file size, resulting in a longer load time.
  • .gif – This file format is good for images that will be animated.

4. Properly name images

Giving an image a proper name not only helps with image identification, it is also good for Search Engine Optimization.  It is good practice to make sure the filename contains the main keyword for your WordPress page or post.  Cameras and stock photos use numbers and words that may not be relevant to the image use. Be sure to rename photos files so they are relevant to the content on the page.  Rather than stock-photo-15637.jpg, rename to the photo to ice-cream-cone.jpg.  It is okay to add the photo size to the end of the photo description. Also, be sure to use dashes rather than underscores when naming a photo, since not all browsers recognize an underscore.

4. Complete image descriptions and details

The most important thing to remember here is that search engines can’t read images! As with properly naming a photo, completing the media attachment details will help search engine bots better “read” the image.

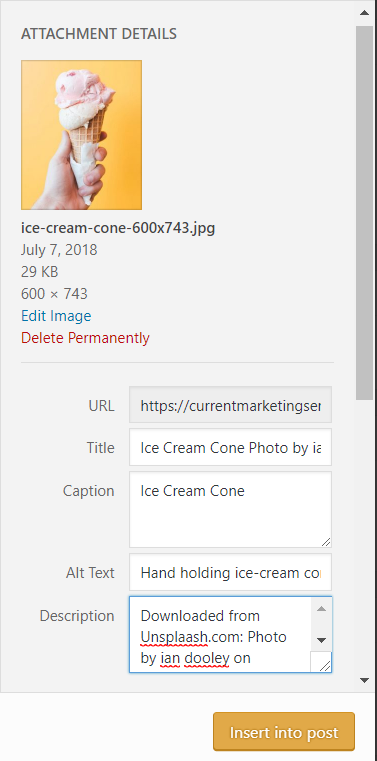
When uploading images to the WordPress media library, you have options to complete the attachment details.  

Image optimization details for ice cream cone photo


The Title will be automatically populated with the file name you gave your image.  You may want to change this to something more descriptive.  The title will also appear when you hover over the image.

The Caption field is used should you want a caption to appear underneath the image.  Adding a focus keyword to the caption may help with  SEO optimization.

The Alt Text field controls what text replaces the image when an image doesn’t load and is used by screen readers and other assistive technology. Filling out the Alt Text field is an important part of building and maintaining an accessible website. It is best to use a description of the image that clearly describes what the image looks like while at the same time trying to incorporate some keywords.  This is the MOST important field to complete!

The Description field is a good place to add details about where the image came from. Image descriptions create meta data that also help website administrators better search for products. This field is not always visible to users and search engines.


Optimizing and making images website friendly is a critical aspect of creating a good user experience.  Additionally, taking the time to fill out the image descriptions fields is a  way to create SEO rich meta data for website images.  Overtime, failing to resize images before uploading them to your website can make backing files up difficult and you may run out of storage space on your server. If you need help with image or website optimization, get in touch with Current Marketing Services.


Filed Under: WordPress Help Tagged With: image optimization, optimize photos, web images, website friendly images

Footer

Business Information

CMS NC, LLC
DBA Current Marketing Services
North Carolina
Phone: 919-780-4810

Services available to clients throughout the United States.

Leave a Review

Current Marketing Services would love your feedback.

Post a review to our Google profile.

  • Website Design
  • Website Security & Maintenance
  • Website Changes
  • Testimonials
  • Website Quote Intake Form
  • Contact

Copyright © 2025 · CMS NC, LLC · Current Marketing Services · North Carolina