Images are an important part of blog posts and pages on your website.

Adding a photo or image to your blog page or website can help add interest to the page, help the reader better understand the content on the page, and help to improve the SEO ranking of a page. A good rule of thumb is to have at least one image per page view as you scroll down a page. Adding too many images may be distracting to the important content on the page, and too many images may slow web page load time. You can check the load time of your website pages at Pingdom Website Speed Test or at GTMetrix.com
Don’t make this mistake – A commonly overlooked aspect of using images on a website is making sure they are website and mobile-friendly. A print-friendly image should not be used in website development.
Here are 4 steps you can take to make sure your images are website-friendly:
1. Resize images BEFORE uploading them:
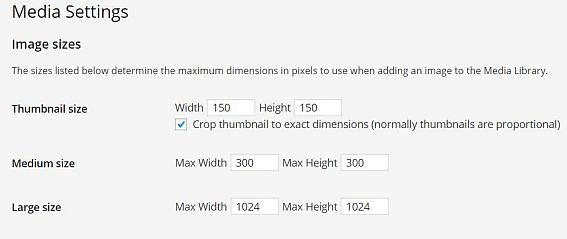
Photos and images on a web page should be sized according to their use. Consider where the image will be used and what size the image needs to be. While in your WordPress dashboard, click on settings, then on Media. You can see the default options for your image dimension sizes. In the example below, you can see that the largest image defaults to 1024 pixels wide. So it makes no sense to upload an image that is wider than 1024 pixels wide. If you are placing an image on your sidebar, the 1024 pixel wide image will be too large. The sidebar is generally about 1/3 of the page width (1024px/3 =341 px,). So a more appropriate size for the sidebar image is 341 pixels wide. The goal is to use the smallest and fastest loading image as possible without affecting quality. The larger the image, the longer it will take to load. The load time of a page is an important consideration for a better user experience. A good user experience directly correlates to improved search engine rankings!

Visit our resource page for links to a few free image editors that can help with image resizing and optimization.
2. Choose the best resolutions – Image Compression:
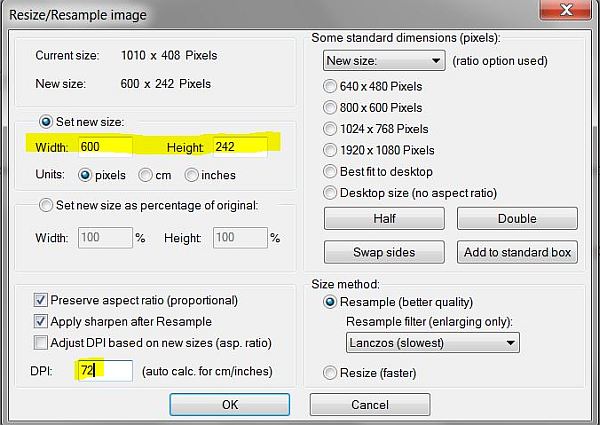
Image resolution is the number of pixels that can fit into an area. A web-friendly image is commonly set to 72 dpi (dots per inch) or more properly ppi (pixels per inch)
Text based png images often are better compressed to 96 dpi. Most importantly is the ending file size. Ideally, a WordPress website image should have a file size smaller than 100KB – larger hero images may need to be sized larger, but we recommend no larger than 250kb.

There are plugins that can be used to optimize images, but it is always better to resize images BEFORE they are uploaded.
3. Choose the best file type for the application:
It’s important to use the correct image format (extensions) for your website.
- .jpg – This file format is ideal for most website image applications. It offers the best file size and image quality, therefore, all website images should be saved as jpgs unless they have a transparent background.
- .png – This file format is necessary for images with a transparent background. Png formatted images are also used when the quality needs to remain high, such as the website ad banner. The trade off is a larger file size, resulting in a longer load time.
- .gif – This file format is good for images that will be animated.
4. Properly name images
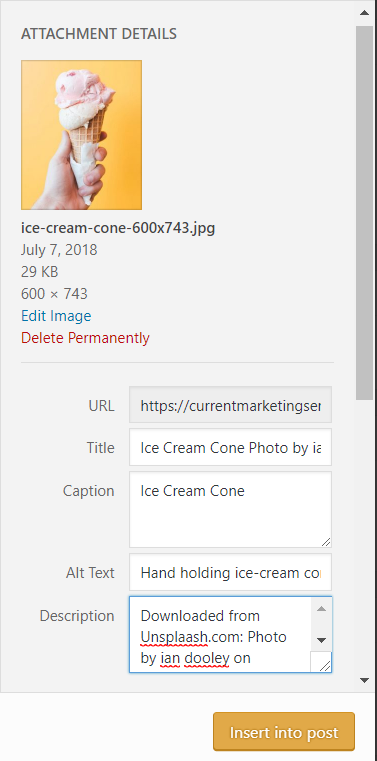
Giving an image a proper name not only helps with image identification, it is also good for Search Engine Optimization. It is good practice to make sure the filename contains the main keyword for your WordPress page or post. Cameras and stock photos use numbers and words that may not be relevant to the image use. Be sure to rename photos files so they are relevant to the content on the page. Rather than stock-photo-15637.jpg, rename to the photo to ice-cream-cone.jpg. It is okay to add the photo size to the end of the photo description. Also, be sure to use dashes rather than underscores when naming a photo, since not all browsers recognize an underscore.
4. Complete image descriptions and details
The most important thing to remember here is that search engines can’t read images! As with properly naming a photo, completing the media attachment details will help search engine bots better “read” the image.
When uploading images to the WordPress media library, you have options to complete the attachment details.

The Title will be automatically populated with the file name you gave your image. You may want to change this to something more descriptive. The title will also appear when you hover over the image.
The Caption field is used should you want a caption to appear underneath the image. Adding a focus keyword to the caption may help with SEO optimization.
The Alt Text field controls what text replaces the image when an image doesn’t load and is used by screen readers and other assistive technology. Filling out the Alt Text field is an important part of building and maintaining an accessible website. It is best to use a description of the image that clearly describes what the image looks like while at the same time trying to incorporate some keywords. This is the MOST important field to complete!
The Description field is a good place to add details about where the image came from. Image descriptions create meta data that also help website administrators better search for products. This field is not always visible to users and search engines.
Optimizing and making images website friendly is a critical aspect of creating a good user experience. Additionally, taking the time to fill out the image descriptions fields is a way to create SEO rich meta data for website images. Overtime, failing to resize images before uploading them to your website can make backing files up difficult and you may run out of storage space on your server. If you need help with image or website optimization, get in touch with Current Marketing Services.